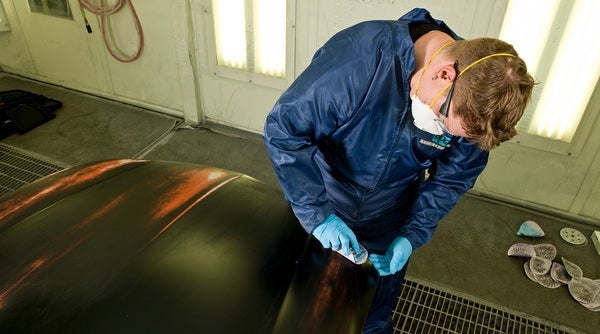
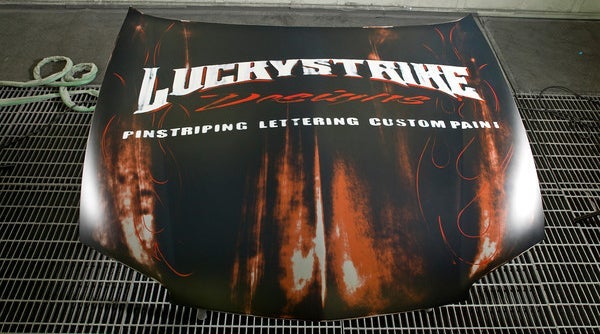
Here's how to give your paint finish the classic signs of distress. It's one of the hottest trends in the world of customizing and restoration. The only problem is, with a traditional paint application, you'd have to wait decades to achieve that vintage appeal naturally. Thankfully, Jeremy Seanor, owner of Lucky Strike Designs Custom Paint and a PPG technical refinish instructor, shows you how to help shorten that time by creating a distressed-looking faux patina.
Faux Distressed Technique – Jeremy Seanor
"A faux patina is a relatively easy effect to create," Jeremy says, emphasizing that knowing how paint wears over time will improve the final appearance. “Getting good reference material is my biggest challenge. Pictures of vehicles that have been beaten by the sun or constantly abused are a good resource."
To create this increasingly popular look, Jeremy recommends using PPG Envirobase® High Performance waterborne basecoat. When properly dried between coats, it delivers the outstanding sanding characteristics required for this type of project. Color selection is also a key component of success. He recommends researching specific model years to pick the right color palette for the era you want to emulate.
Here's How Jeremy Tansformed an Old Chevy Cavalier Hood
Step 1 - Applying "Primer" Colors
Gray and red were common colors for primers on older builds, but you should research the colors you want to reveal through the "distressed" topcoat. In this example, we sealed the hood with ECS25 Gray A-Chromatic LV Sealer, and then applied color coats of T436 Red Oxide until hiding was achieved.
Step 2 - Drying
It’s critical that each layer dry completely before applying the next coat. Smooth, predictable sanding is important to the patina affect, and if the layers have not completely dried, the paint can tear. On this project, Jeremy used a hand-held, Venturi-type blower to thoroughly air dry the basecoat and ensure sanding quality.
Step 3 - Topcoat Color
As you research colors for the year you’re looking for, you'll find a tremendous variety of solid colors to choose from. For historical accuracy and overall effect, pearls and metallics are not usually selected as the topcoat color. In this example Jeremy applied three coats of a 50-50 mix of black EHP basecoat T407 and T409.
Step 4 - Sanding
Before exposing the underlying colors, think about how your project vehicle would weather naturally. The front would take the most abuse, so you'll want the most exposure of underlying coats there, gradually lessening as you move to the rear. In addition, high points would wear faster. On this hood, Jeremy targeted these areas for extra sanding to reveal both the gray and red layers. If you remove too much color, you can easily repaint and re-sand the area.

Step 5 - Grit and Usage
Sanding with different grades of sandpaper is the technique for creating the desired levels of "wear." The more distressed you'd like the finish to appear, the heavier grit you should start with. In this case, Jeremy began sanding with 400 grit paper and moved up to 800 grit. "You'll use a ton making this effect," Jeremy warns.
Step 6 - Dull Gloss
Weathered, painted parts typically have lost their gloss. So another key to achieving the distressed patina look is the use of a matte or flattened clearcoat. And here you have several options. On this hood, Jeremy used Global Refinish System® D8113 Matte Clearcoat. Other well-suited choices include adding a flattening agent to Deltron® clearcoats like DC3000 High Velocity Clear, DC3010 High Velocity Clear LV, DC4000 Velocity Premium Clear or DC4010 Velocity Premium Clear LV.
Step 7 - Lettering
To remove any dirt nibs, the hood was sanded smooth with 600 and 800 grit paper. After that, Jeremy affixed a vinyl paint mask for his lettering layer.
Step 8 - Brush Painting
Jeremy hand painted the company name, the period-correct method for lettering. White/red was the most frequently used color combination for lettering in the 1940s and 50s.

Step 9 - Vary Paint Coverage
Looking at the letter L, notice that parts of the letter were thinly coated intentionally. When sanding, these areas will allow the black basecoat to bleed through, enhancing the weathered effect.
Step 10 - Sanding the Lettering
To unify the aged appearance, you'll need to sand the lettering as well. As you can imagine, crisp lettering would look out of place on this surface. During this step, Jeremy used 800 grit paper.
Step 11 - Surface Cleaning
Jeremy preps the hood with SWX350 H2O-So-Clean™ Waterborne Pre-Cleaner to rid the surface of sanding dust and any possible contaminates. Then the surface was cleaned with Deltron DX330 Wax & Grease Remover.
Step 12 - Final Clearcoat
Jeremy completes the look with Global D8113 Matte Clearcoat. The matte finish ensures that the hood will have the dull reflection of a true vintage ride.

