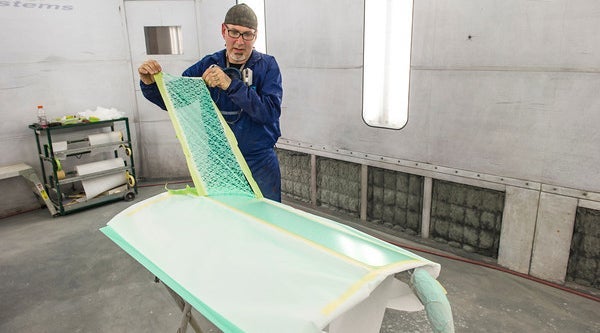
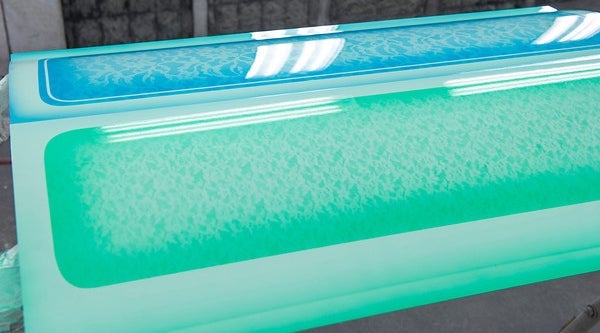
Darryl Hollenbeck shows how to create an old-school lace effect in just a few simple steps. It’s a throwback style from the 1960s, one that Hollenbeck describes as a bit of a lost art. A touch of lace goes a long way, he acknowledges, but on the right project in the right amount, it’s killer. You can find examples of the effect on his Iron Orchid and 1959 Ranch Wagon.
Lace Technique – Darryl Hollenbeck
Darryl's Steps for Creating an Old-School Lace Effect
Step 1 - Lace Selection
The right lace will make, or break, this technique. "Pattern clarity is the key to doing it right," Hollenbeck says. Most fabric stores offer many workable choices, although Hollenbeck prefers vintage material. Patterns with larger elements are better suited for hoods and roofs, but always opt for lace with dense designs. Lace with large holes will not lay flat, distorting the effect. Also, avoid fabrics with glitter that may affect the paint surface.
Step 2 - Basecoat
Hollenbeck applies three coats of Envirobase® High Performance basecoat color over the entire panel, a custom mint green (T400 White and T430 Green), reduced 4:1.

Step 3 - Pearl Midcoat
Next, three coats of Envirobase® High Performance T457 Green Pearl are applied over the entire panel. Then the area is taped out for the first lace pattern on the green effects section.
Step 4 - Lace Pattern
Creating a sharp pattern requires careful masking. "Make sure the lace is pulled tight to the panel so there are no wrinkles," Hollenbeck explains. "You have to stretch it a little bit, but you want to stretch it evenly. You don't want a gap between the panel and the lace."
Step 5 - Light Coats
Using low pressure to avoid lifting the lace during the application, Hollenbeck applies light coats of a custom dark lace green (20 parts T430 Green to 100 parts T490 Tinted Clear). "Once the lace starts turning color, you should have good coverage."
Step 6 - Peel and Clean
Peel the lace from one end to the other in a single, slow sweep. Tack the surface to remove any lint or threads left behind.

Step 7 - Edge Fogging
To heighten the contrast, the border of the green panel is fogged with the custom dark lace green color. "The panel is darker on the edge and lighter in the center. It’s kind of a cool effect."
Step 8 - 2nd Panel Prep
After masking out the green section, Hollenbeck preps the second panel, adding a 1/8-inch stripe on the inside for variety.
Step 9 - Blue Lace
The lace for this section is the same pattern except with larger elements. It was painted using the same steps as the green section. The stark dark lace blue (20 parts T412 Blue to 100 parts T490 Tinted Clear) works well with this pattern.
Step 10 - Clearcoat
Hollenbeck sprayed two coats of EC750 One Visit® Appearance Clear with the ECH7090 Slow Clearcoat Hardener (4:1 ratio). After sanding flat to even the lace texture, he sprayed two additional clear layers.

